Dataset Description
Puzzle-STAMPS — A Multimodal Motion–Physiology–Speech Dataset
Phase 2 — Collaborative Task
The experience comprised 13 unique puzzles organized into eight timed segments. Each segment has a maximum duration; if the timer reaches zero, any unsolved puzzles in that segment are skipped automatically. Puzzles integrate visual search, decoding, and object manipulation, requiring coordinated effort from all four team members.
▶ Watch Video Example - Team 4
▶ Official Deadly Hallows Walkthrough
“Welcome!
Your first task is to solve a puzzle located on side 1 of the box.
Pay close attention to every detail, work together, and think ''outside'' the box.
Good luck, and let the journey begin!”
- Symbols list: Side 1 of the box has a list of symbols.
- Directional buttons: Side 2 of the box has four buttons with directional arrows (up, down, left, right).
- Find clues: Find the symbols around the box; each symbol has an arrow next to it.
- Solve: Press the arrows in the correct order according to the original list of symbols.


- “[Side 1] What strange symbols are around this lock? I am sure I have seen them elsewhere.”
- “[Side 1] I have seen these triangles near the lock on other sides of the box. They must have a meaning.”
- “[Side 1] Decode the triangles and use the buttons on side 2 to input the code.”
Solving Puzzle 1 opens a trapdoor revealing (a) a map, and (b) four codes used in subsequent puzzles to open boxes I, II, III, IV from the toolbox.


“Follow the map to solve 6 puzzles.
Decode the codes from the trapdoor using the toolbox after solving puzzle 2.
1 code → 1 box → 1 puzzle.
Puzzles 2 and 4 do not have boxes.
Please communicate these codes verbally rather than writing them down.”
- Maze screen: Side 4 of the box has a circular screen with green rectangles and one red dot.
- Directional buttons: The opposite side (side 2) has four buttons with directional arrows (up, down, left, right).
- Solve: Use the arrows to move the red dot to the center of the maze twice. The red dot must avoid the moving green obstacles.
- Teamwork: Ideally, one person looks at the maze and guides the person pressing the buttons, since the maze and buttons are on opposite sides of the box.


- “[Side 4] You must guide the red dot through the maze without getting caught by the barriers.”
- “[Side 4] Use the arrow buttons on side 2 to navigate through the maze. The barriers will start moving after you first press a button.”
- “[Side 4] You need to reach the center of the maze twice without hitting the moving barriers. Each arrow button on side 2 controls one direction of the red dot.”
This segment contains six puzzles. Sub-puzzles 3–7 can be solved simultaneously by splitting the team; each yields symbols that feed into sub-puzzle 8 (Mirror), which closes the segment.


- Fairy paper: The team receives a paper with different fairies and their associated symbols.
- Trap door clues: Inside a trap door in the box there are drawings of two fairies.
- Solve: Match the fairies from the trap door to the ones on the paper and identify the corresponding symbols.

- “[Side 1] Look closely at the paper with the fairies. Have you seen these fairies elsewhere?”
- “[Side 1] Under the lock, two fairies stand as silent guardians.”
- “[Side 1] Find the same fairies from under the lock on the paper you possess to reveal their symbols.”
- Solution displayed:

Fairies solution
- Symbols: One side of the box has many symbols drawn on it.
- Solve: Identify the two symbols that are unique (appear only once).

- “[Side 3] There are many symbols on this door, but are they all the same?”
- “[Side 3] I am sure some of these symbols are more unique than others.”
- “[Side 3] There are two symbols that are not repeated on this door.”
- Solution displayed:

Symbols solution


- Wand and decoding table: Participants receive a wand with beads and a paper with a decoding table converting braille to symbols.
- Decode the wand: Use the beads on the wand to decode a message based on their order and size.
- Decode the code: One side of the box has a spider web with different symbols. At the intersection of the three decoded symbols on the web, find two other symbols.
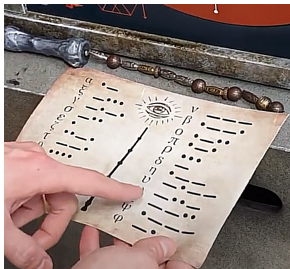

- “[Side 2] This spider is hiding something in its web. The magic wand and the decoding table will show you exactly what it is.”
- “[Side 2] The tail of the wand has small beads. Use the decoding table to read the pattern, just like Morse code.”
- “[Side 2] Find your decoded symbols on the spider’s web. Where they intersect, you will find the solution.”
- Solution displayed:

Spider solution


- Pattern paper: Participants receive a piece of paper with a pattern to decode. When decoded, the pattern reveals a sequence of symbols.
- Circle sequence: One side of the box has a sequence of circles in the same shape as on the paper.
- Solve: Identify the highlighted circles on the box that correspond to the correct positions of the symbols from the decoded paper.

- “[Side 4] There is a mysterious row of circles below the maze. It looks familiar.”
- “[Side 4] The circle sequence under the maze matches the one on the pattern paper. Try comparing them.”
- “[Side 4] Decode the pattern paper and focus on the highlighted circles on the box. Their symbols will reveal the solution.”
- Solution displayed:

Sarcophagus solution


- Quidditch court paper: Participants receive a paper with a Quidditch court and symbols corresponding to different hoops.
- Box drawing: One side of the box has a similar drawing with two hoops connected.
- Solve: Identify the symbols corresponding to the two connected hoops.

- “[Side 3] Two hoops are connected. Have you seen them before?”
- “[Side 3] The hoops on the box match the ones on the Quidditch court paper.”
- “[Side 3] Find the symbols linked to the two connected hoops on the paper. They will give you the solution.”
- Solution displayed:

Quidditch solution
- Symbol matching table: Participants receive a table that matches pairs of symbols to unique symbols.
- Decode pairs: Decode the pairs of symbols identified in the previous sub-puzzles to find the unique symbols.
- Enter symbols: Enter the sequence of unique symbols using buttons on one side of the box.

- “[Side 1] Find six pairs of symbols to light up the Mirror of Truth.”
- “[Side 1] Each pair of symbols reveals a unique symbol in the matching table.”
- “[Side 1] Use the decoded symbols to enter the correct sequence and open the Mirror of Truth.”
- Symbol table: There is a table with symbols inside a transparent glass.
- Dials: Next to the glass are four dials, each pointing to a symbol and surrounded by other symbols.
- Solve: Using the table, identify how to rotate each dial to point to the correct symbol.

- “[Side 1] The combination revealed by the mirror holds the key to the dials.”
- “[Side 1] Each dial shows a symbol. Find which two mirror symbols combine to create it.”
- “[Side 1] For each dial, use the mirror’s table to find the matching symbol, then turn the dial to point to it.”
Solving Puzzle 9 opens a new trapdoor on side 4 revealing (a) the rose wand, and (b) the code to open box V from the toolbox.


- Constellation paper: Participants receive a piece of paper with a constellation diagram.
- Shining dots: One side of the box has shining dots resembling stars.
- Solve: Use the wand to touch the box and light up the stars to recreate the constellation from the paper without crossing any edge twice.

- “[Side 2] The stars are waiting to be connected. Have you seen these stars before?”
- “[Side 2] Use the shining stars to recreate the constellation shown to you on the paper without retracing the same path.”
- “[Side 2] Use the rose wand to create the constellation. Connect all lines without tracing the same path twice.”
Solving Puzzle 10 opens a new trapdoor on side 2 revealing (a) the Elder Wand (Hallow), and (b) the code to open box VI from the toolbox.


- Jigsaw puzzle pieces: Participants receive a box containing jigsaw puzzle pieces and four artifacts.
- Solve: Assemble the jigsaw puzzle on top of the box so that all pieces fit in their dedicated places. Once the puzzle is solved, place the four artifacts into the corresponding holes in the puzzle.

- “[Top] Look closely at the shapes of the pieces. Assemble the mosaic correctly.”
- “[Top] The mosaic will help you place the artifacts in their correct places.”
- “[Top] Notice the shapes of the artifacts and the corresponding holes in the mosaic to place them.”
Solving Puzzle 11 opens a new trapdoor on side 1 revealing (a) the Robe of Stealth (Hallow), and (b) the code to open box VII from the toolbox.


- Rotating disk: Participants receive a rotating disk.
- Disk setup: One side of the box has other rotating disks with one missing in the middle.
- Solve: Place the disk in the middle and align the other disks so that their edge colors match.

- “[Side 3] At the joints of the rotating disks, the colors must match.”
- “[Side 3] You must insert the last disk according to the arrow, then match the colors.”
- “[Side 3] Move the surrounding rotating disks to match the new disk in the middle.”
Solving Puzzle 12 opens a trapdoor revealing the final Hallow.

- Circular disks: Participants have three small circular disks (hallows).
- Empty spots: On top of the box, there are three empty circular spots.
- Solve: Place the three disks into the empty circular spots.

- “[Top] Place the three Hallows.”
- “[Top] Place the three Hallows on the three circular spots.”
- “[Top] Try placing each disk one by one, making sure they fit into the empty circular spots.”
Hint Delivery System
Hints are delivered by the experimenter via a standardized, timer-driven protocol:
- Timer trigger: Each hint level becomes available after a fixed elapsed time within the segment, ensuring consistent hint timing across all teams.
- Three levels: Level 1 provides a mild directional nudge; Level 2 narrows the solution space; Level 3 provides near-explicit guidance.
- Controlled skip: If a team has not solved a puzzle after receiving the Level 3 hint, the experimenter offers a controlled skip. The solution is shown and the team advances to the next segment, ensuring all teams cover the full puzzle sequence.
- Game-state logging: All hint deliveries and skip events are logged with timestamps synchronized to the master acquisition clock.
← Phase 1 — Pre-Task Baseline Phase 3 — Post-Task Evaluation →